Saturday, 26 January 2013

Hatch a plan

Apart from looking particularly scruffy, the wood trim on the hatch was actively channeling rain water into the cabin.  I decided today was a good day to tackle this job.

Although rotten and held on with the ghosts of mild steel wood screws it still took some time to remove.  The main problem was the horrible handle that had been screwed on from  the inside then fibre glassed over. I used the dremel to get to the screw heads, but they had decided they were not going to shift.  They dremel was then used to saw through the handle and the screws then knocked back through. A fair amount of sanding and cleaning then took place to remove the old glue and ensure every thing fitted nicely before moving on.

The main problem with its design was that it didn't over hang the wash boards, so any rain would just run in under it. I thought it best to make the new piece quite a bit thicker,  I also set the saw blade at a 10 degree angle to give it a nice profile then finally set the blade really low, about 2mm and routed a drip channel into the underside.


Once happy with the shape and finish, I drilled & Countersunk holes for the stainless steel screws, spread the mating surface liberally with sikaflex; then attached; making sure it was pressed home all the way. 
A massive sikaflex clean up operation ensued! It's nice to be making progress again, I'm chuffed with this job, it went  as smoothly as could be expected. Just needs a rub down and varnish once the sikaflex has dried. 

Friday, 25 January 2013

Small progress

So in the spirit of moving forward, yesterday I stopped off at Machine Mart to pick up a 10" blade for my table saw and a 3/8 bsp straight through union. Which meant this morning, bright and early before work got in the way, I was able to tick one job off and start on another.
The union was to enable me to finish the auto pilot extension This is a piece of Ali from a golf trolley, cut to length, and tapped at each end to accept the union and the original end piece. The thread isn't exactly right but its close enough and as the whole thing cost about £1 I am prepared to accept this. Once assembled it won't be disassembled so no problem.
The saw blade enabled me to cut the battens for raising the fore-peak locker lids from the scavenged hardwood door frame, seen leaning up against the garage :).

Thursday, 24 January 2013

Where has the enthusiasm gone?

I must slap myself around a bit for not getting stuck in enough recently.  I'm sure I could come up with a million excuses about  the snow, ice freezing temperatures and family & work commitments   but at the end of the day there is always something that I could be doing to keep the project moving forward. The  spark that has kicked me back into life came from Roger.. While I was bemoaning my excuses  to him the other day he offered to cut out some new backing pads for my seacocks as the ones I fitted are woefully undersized.  It then occurred to me that Roger will have done more work on Ciao Bella in 2013 than I  have... even worse, he asked me for the  diameter of the holes for the skin fittings last week and I still haven't got back to him... Unforgivable.
So here's my commitment:  I will complete at least one item... no matter how small per week. (Starting with measuring the skin fitting tails).

One more thing to cheer me up was this facebook post from Swift sails :o)
  

Tuesday, 1 January 2013

Toilet is in

Last day of 2012 spent peering into a toilet bowl :-)  Well at least it's in now.  First job was to cut the holes for the pipes to fit through.
Then fit the elbows and tails with PTFE, fit the pipes onto the tails; made easier by heating in boiling water, and securing with two hose clips on each fitting.


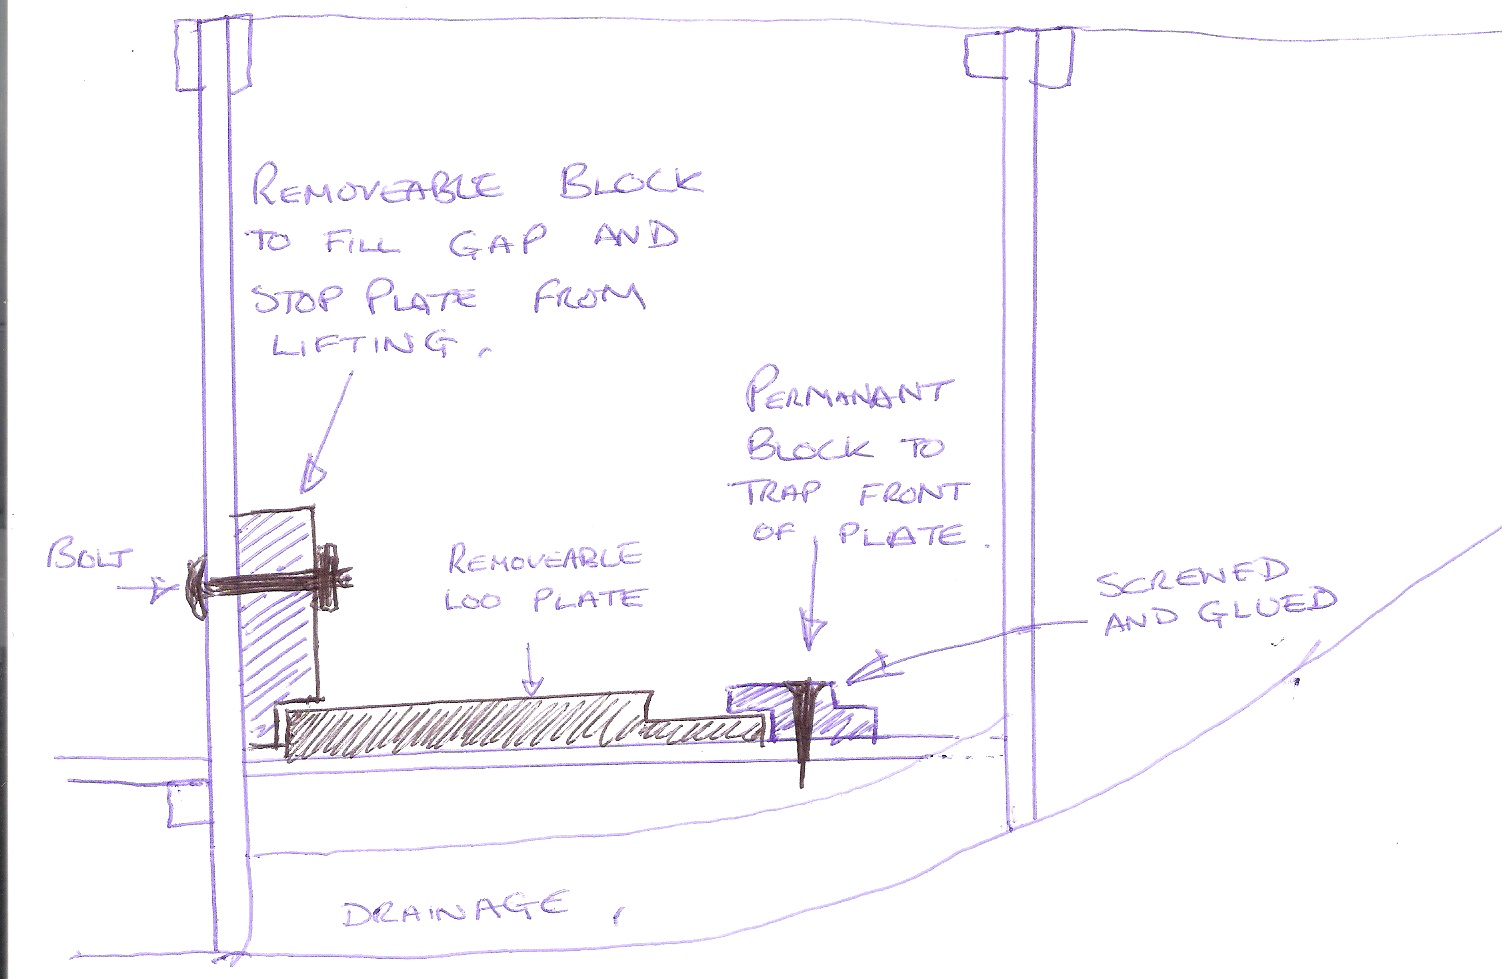
I then had to come up with a cunning plan to secure the loo in place. As there is a drainage pipe in the front of the locker, visible in the picture above, I could not make the base plate fit all the way to the front of the locker.  Instead I made a block with a lip on it that I could screw and glue to the floor which the base could slip under. The aft end could then be held in place with another. removable, block which would hold the base both horizontally and vertically.
This is all best explained with a picture.


Sunday, 30 December 2012

Toilet blockage breakthrough

It's been a while since I clambered aboard Ciao Bella for anything other than a quick check. To be honest I'd come up against a mental block while fitting the loo... I've just broken through that block :-)
When I fitted the seacocks I had planned to have the tails pointing straight up, as this is how I'd seen others fitted.
When I realised how much radius I'd need on the sanitation pipe I decided that I wanted the tails to come of at 90 degrees. I picked up a pair of elbows but the outlet one was too close to the side of the compartment for it to thread on.
I didn't want to rush this and get it wrong again so I've been dickering about trying to come up with a plan. The easy out was to loosen the skin fitting, assemble the tail and elbow onto the ball valve and the re bed the skin fitting. This would have meant being able to put it together without attacking the woodwork in the boat but had the downside of not being able to disassemble while afloat.
Tonight I have taken the bull by the horns and hacked, ground, filled & chiseled the woodwork to allow the elbow to spin on. The outlet hose will now route over the top of the inlet hose and the action of the handles is not impeded. I feel like a weight has been lifted, I plan to get up early tomorrow and spend the whole day working on her.

The picture show the modifications to the cupboard sides to accommodate the elbow and with the seacocks loosely assembled to show how the pipe will fit and clearance for the handles.


Sunday, 9 December 2012

More holes.

After a period of inactivity, I thought I'd better get on with something.
I am mid way through fitting the seacocks for the head. First I made a couple of backing pads out of marine ply offcuts. Then bit the bullet and drilled through the hull. I have positioned the intake forward of the outlet.. Not sure if the is any hard and fast rules here but I didn't fancy sucking up what had just been discharged.
I shortened the thread on the skin fittings to give the hose as much room to bend as possible.
Assembly was straight forward. I glooped the joints in sikaflex and assembled. I shall leave the final tightening until tomorrow to let the sikaflex go off and then trim off the excess.


Monday, 3 December 2012

Buying frenzy

The last few weeks have seen some purchases for Ciao Bella... the pot of money is disappearing quicker than the Liberal party's principles.  There has been a lot of eBay activity and not all of it successful.
First were the seacocks,  Bought off Preloved, an absolute bargain at £50 for the pair with skin fitting and tails.  Seller had bought new to fit loo but decided against it.
My new cooker in it's old home.
Next was the Loo itself... I followed and bid on several Jabsco compacts, however they all seemed to go for far too much money, considering a new one was only £98... So a new one is what I got.
Then came the cooker.. That was a stroke of luck.  I was speaking to Rog and he mentioned he'd bought a new cooker for his Hurley 24/70.. I knew he had an Origo 3000 so we came to an agreement over that... Sweet :o) The only down side with the Origo is that it doesn't fit in the Galley... which is a tad annoying.

Now the big one, the Main Sail. There is lots of choice here, in the end I decided to buy from Swift Sails, a combination of price and recommendation. I nearly bought locally, more expensive but sometimes it's more convenient. Anyway, that would have involved me raising the mast to take measurements... I couldn't be doing with it. Roger, Nick Vass and Swift had already done the measuring up side on Big Easy so I know their plan fits. As soon as Jamie from Swift gets back from Thailand I'll get the order placed.


My final spend has been on a spinnaker.   I've chased a few of these on eBay, some go cheap, some not so. I finally got one off eBay from a Vivacity for £67.  Hopefully it will fit without having to take to Jan's for a trim :)
The one thing I've found with all these purchases is that the spend doesn't stop there... The Toilet and seacocks needed another £60 worth of pipe and fittings, the cooker with need gimbals and pan  holders.. another £120; the main sail will deserve a nice cover and the spinnaker will need miles of Guys, sheets, halyard, uphaul, downhaul, pulleys, cleats, shackles and even a turtle.. apparently.
What I could really do with, and I don't seem to be able to find it on eBay, is time, lots of it.. oh, and some reasonable weather.